
A soundproof recording booth may be the perfect start to a recording session. But what do you do when the room doesn’t have much ventilation? Cooling your recording booth is critical to your performance and acoustics.
If you’re thinking of ventilating your booth, there are several ways you can achieve this. Here are 7 ideas for how to keep a vocal booth cool:
- Use portable air conditioning units
- Build a dead vent
- Build a vent baffle
- DIY expert build
- Use a fan
- Fan + ice packs
- Fan + ice packs + chopsticks + styrofoam
Keep reading as we deep-dive into all seven ways to ensure your recording booth is cool, but first…
Why Are Recording Booths Hot?
Recording booths can get a little bit hot, depending on their location. If you have a DIY booth in a closet somewhere on the top floor of your house, getting hot is inevitable. Even if you live in a cooler area, poor ventilation in booths prevents proper airflow, thus making it get hot quickly.
So, to keep your booths cool, there are several ways to go about it. You can buy an AC fan or develop different DIY techniques – it all depends on your budget and skills. Here are the best ways to keep your recording booth cool at all times.
1. Use Portable AC Units
Although not the cheapest, an actual AC unit is usually the quickest way to get ventilation in your recording booth. Air conditioning units give you more control of the temperature and airflow.
Portable ACs have a wide price range from $40 to $400, depending on the size and model.
Here are some portable AC units suitable for vocal booths:
- Anbber Portable Air Conditioner. This one comes at just under $40 and does an excellent job with added purifier and humidifier. The cooling fan has low noise that won’t interfere with your recordings.
- NEPO Portable Air Conditioner. This badass comes at a higher price than Anbber but has more flexibility and control. It has adjustable temperature levels, a dehumidifier, and other features. The NEPO Portable AC costs $249, so you need to think it through before buying.
When choosing an air conditioner for your vocal booth, check on how easily they connect. One company is Quietflex. Quietflex helps with ventilation and any other pipe that leads air into your recording booth.
2. Build A Dead Vent
A dead vent works similarly to a soffit muffler but has more flexibility. It can fit in walls, under floors, typically in spaces where you’ll find an HVAC system.
A dead vent uses the principle of dead air space, which is an extra space not attached to the soundproof room. Here, sound waves are trapped when they enter this space and can’t be heard on the other side.
The vent system will have two places, the intake, and exhaust, where it directs airflow, pumping air into and out of your soundproof room. You do not need to connect this system to an extra AC unit, although it is possible.
Having it in a separate room with its fans will relieve the noise levels while recording. A dead vent is excellent for a booth built inside a well-ventilated room.
3. Build a Vent Baffle
You can also use a vent baffle that takes up less space than your current AC system. You can make a DIY baffle using a 2″ thick foam, MDF, Weatherstripping, and a 6″ duct fan.
To build a vent baffle, you need to make a box 1″ wide and 2″ tall using MDF and add a layer of insulation to the box. When lining insulation, use several 90-degree turns in the box to ensure as many sound bounces as possible (this scatters the waves sealing gaps).
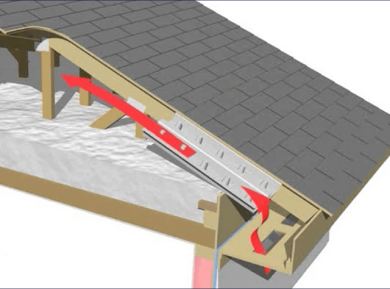
4. DIY Expert Build
If you have excellent craftsmanship skills, here is another way to add ventilation to your vocal booth. This professional cooling system is made with two large boxes outside your vocal booth.
One box has the work to suck all the hot air outside while the other box helps cool the air, ensuring you have the ideal breeze.
However, the steps to build this next-level cooling system are laborious, and it would be lengthy to present them here. Luckily, this excellent video shows the whole process so you can create your DIY cooling system.
5. Using a Fan
Though this is not the best solution, an actual fan can help you cool off during a recording session.
If you don’t want noise, use the lowest settings that’ll possibly keep the fan nice and silent. Also, be sure that the fan is not pointing at the microphone or that the air produced by the fan isn’t deflecting into the microphone.
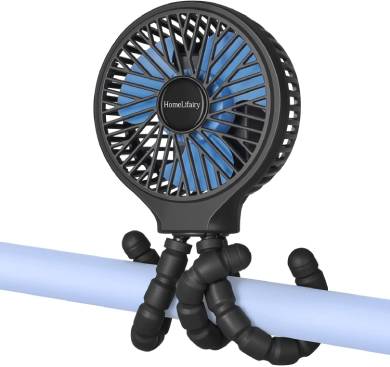
Of course, we’re not talking about huge standalone fans – USB-powered or handheld fans can do the job. Plus, they retail for around $20, so you won’t have to use all your savings.
6. Fan + Ice Packs
A fan and ice packs are another option to use the ventilation fan as it gives a more cooling effect. However, using an ordinary fan in a vocal booth only palpitates warm air, so you need a pack of ice cubes to bring in a cooling effect.
Use the ice pack and build a fort on two sides, putting one on top of the other. Use the fan to blow air from behind, bringing in a cool breeze.
This method can be used to quickly cool the room down between takes too.
7. Fan + Ice Packs + Chopsticks + Styrofoam
This one is a bit out there, but it works. If you have styrofoam lying around some chopsticks, stick them into the styrofoam and place ice packs between them. Then, place your fan on one side and turn it on.
That’s it!
Alternatively, you can also use soffit mufflers to create a duct in the soundproofed room.
Summary
As you can see, ventilation of a vocal booth isn’t something people think about in the process. But there are a few ways to keep the air cool and comfortable.
These seven easy ways to build your cooling systems will help you get that preferred temperature. While most people won’t spend much time in the booth, professionals who take hours may need a well-ventilated booth for optimal sessions.
Our techniques may not be your long-term solution, but they can work in a pinch, so try them out and let us know which one works best for your setup!