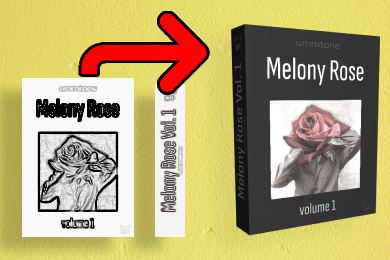
There are many methods and software available to create box art for sample packs. The method used in this post is free and the way I go about making them!
To make box art for a sample pack for free:
- Create the box front and side images in Photopea
- Create the box using Ronenness 3D Box Shot Maker to display the front and side images as if they were a box.
In this post, we go into more detail on what software is used, what to put on the box, and even a template you can use to get started!
Free Software to Create Sample Pack Boxart
- Image editor: Photopea
- Box art creator: Ronenness 3D Box Shot Maker
- Key/BPM: Song Key/BPM Finder
Image Editor
There are a lot of image editing/processing software out there. I like using Photopea because it is a free, online tool like Photoshop.
If you’re not interested in learning the basics of Photopea, Canva is a great option. It provides many templates that can be used and provides a lot of images that can be used!
If you have Photoshop, Illustrator, or the like, feel free to use those to create your box art instead – I would if I could!
Box Art Creation
Learning how to manipulate photos to look 3D and like a box or learning 3D modeling is a tough skill to learn. Once I have created the front and side art for the sample pack, I use Ronenness 3D Box Shot Maker to create my box image.
When using 3D Box Shot Maker I use the setting that only shows the side and front of the box, this means I don’t have to create a back, top, bottom, etc.
There are other free and paid options out there too:
- Boxshot lite (free, online generator)
- Boxshot 4 (commercial)
- Boss Eye (freeware)
- Ronenness 3D Box Shot Maker (online)
Song Key/BPM Finder
Music theory isn’t everyone’s strong suit, but having the key of a melodic loop is key to creating a good sample pack. I like to use Tune Bat to verify or double-check the key of my loops.
Typically you know the BPM of the sample you’re creating because it’s in the DAW. But if you’re into sampling songs or a loop doesn’t have the BPM displayed this is a great tool to get the BPM.

Additionally, Tune Bat will also give the BPM of the song. I have found that most of the time it is accurate but it can sometimes be off by 1 if you make a slow song with an odd-numbered BPM.
For example, our song might be 149 BPM, but Tune Bat says it’s 73 or 74 BPM.
What to put on a Sample Pack Box
- Create art to display on the front box
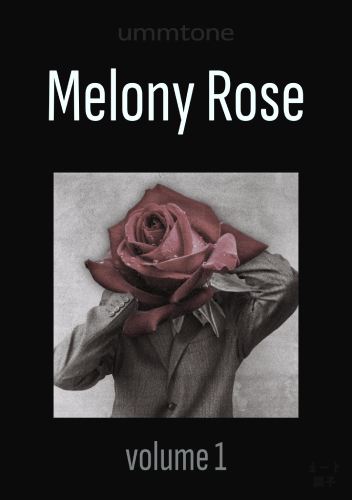
- Create a front cover box image that displays:
- Company name
- Sample pack name
- Artwork
- Optional: Sub-title below or above the image.
- Optional: Logo below the image
- Create the side cover box image
- Company logo
- Sample pack name
- Company name
Creating the Covers
I use Photopea to create the covers for my box art. It has many built-in tools, however, you need to create your own graphics too. If you’re not graphically inclined check out Canva it can be an all-in-one place to create box art.
The dimensions of the covers are quite flexible, depending on how rectangular or square you want your box to be.
I use the following dimensions for my covers:
- Front cover: Width=2079, Height=2953
- Side cover: Width=579, Height=2953

Creating the Box
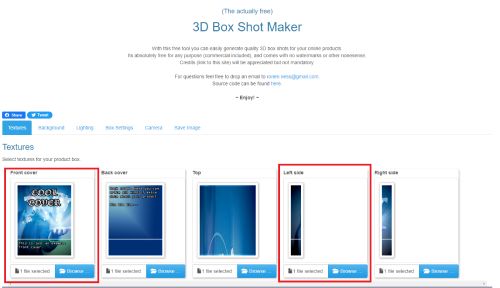
First, navigate to Ronenness 3D Box Shot Maker.
There you will see their front page.
Uploading Images
You will need to upload a front cover and a side cover.
Setting Background
Next, select the Background tab. Here you will set the background to transparent.
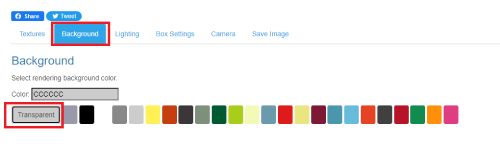
This will allow your box to be put on any background in the future without a giant white/black box around it.
Setting Box Dimensions
Now navigate to the Box Settings tab. Here is where the box dimensions are given.
I like using:
- Box width: 1000
- Box height: 1300
- Box depth: 300

Feel free to play with these settings after we adjust the box angle to find something that works for you!
Setting Camera Angle
Now hide the unused parts of the box by clicking the Camera tab.
Set the look position to -995, 211, 1688
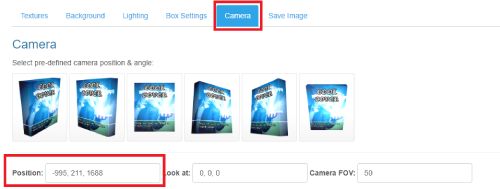
We should now have a good-looking box!
Saving Box Art
Finally, save the image in the Save Image Tab.
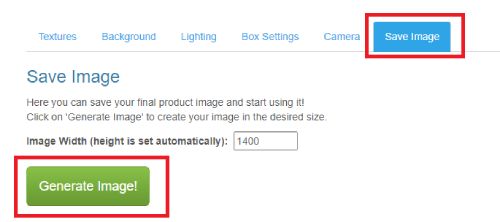
I generally keep my image width as the default 1400, but then resize it in Photopea. I find this gives the best results.
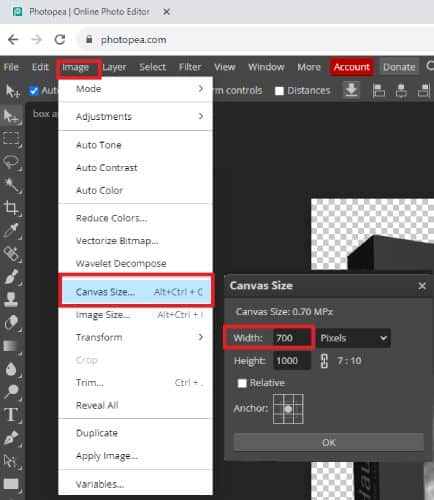
Below is an example of how I resize the image. I upload it in Photopea and navigate to Image, then Canvas Size. If you used the same sizes I did, I cut the width in half.
Be sure to recenter the image by clicking and moving it (click the arrow on the far left, then click the image, Photopea will assist from there).
Finally, save your image as a PNG as they keep the transparent background.
Summary
This is just one of the ways to create box art and is the method I use.
If you’re not too savvy with Photoshop-styled software Canva may be better suited for you!
Canva is one of the easiest and quickest routes to create box art. In Canva you can both create the art and the box all in one.
Bonus:
Curtiss King created a great tutorial for creating Sample Pack box art using Canva!